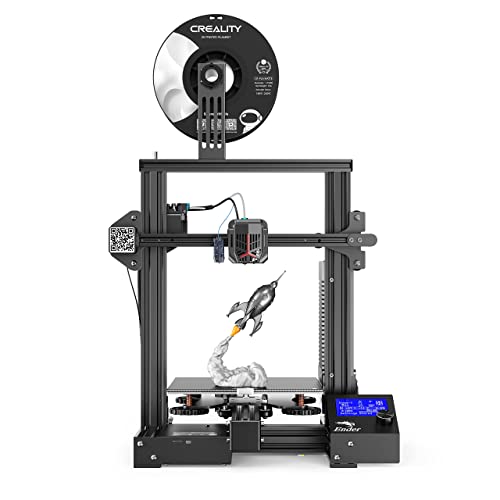
Sovol SV07 3D Printer with Klipper 5 inch Touch Screen, Max Print Speed 500mm/s, 300℃ High Temp All Metal Hotend Planetary Direct Drive Auto Leveling Meanwell Power Supply Print Size 8.66x8.66x9.84in


Key features
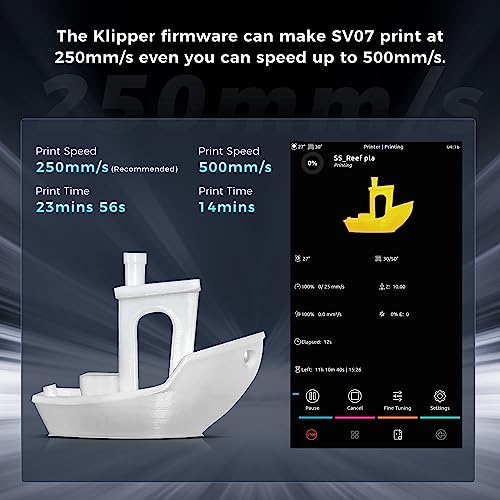
- •【Klipper Makes Print Speed up to 500mm/s】SV07 is equipped with 480x800 high resolution 5 inch touch screen which brings you totally different experience from knob screen and normal 4.3inch touch screen in the market. Klipper firmware allows the high-speed printing of SV07 up to 500mm/s. We recommend you to choose 250mm/s for optimal results. Klipper also offers a range of function options, including the height map and input shaper, while you could DIY based on your specific needs.
- •【300℃ High Temp Printing】All-metal hotend setup comes with a larger melt zone, which makes SV07 could print at 300℃. An extra large fan at the rear of the extruder offers SV07 triple airflows to quickly cool prints and achieves good layering for better results. It makes the high speed and high temperature possible. No more PTFE replacements or firmware flashes needed to print with different materials easily, like ABS, Nylon, carbon Fiber, PC, PETG, Wood, etc. (Enclosure still required for printing above 260℃)
- •【Planetary Dual Gear Direct Drive】 With Sovol's self-developed all Metal Direct Drive Extruder that comes with planetary dual gear set, SV07 offers a higher drive ratio and lighter motor for precise extrusion. We also have added a large external knob to make feeding easier, so you can focus on your printing project with minimal interruptions.
- •【25-point Bed Leveling】SV07 uses 25-point auto leveling with an inductive sensor to detect and compensate for unevenness in the heated bed. This precise and smart technology makes it possible to get a fantastic first layer. Note: Set initial layer height to 0.3mm when slicing will help you get optimal results.
- •【Double Sided Black PEI Plate】The flexible plate of SV07 is not only a magnetic print bed which offers excellent adhesion but also a durable part. You could remove prints easily without any tools. And its double sided design ensures that it will serve SV07 for longer time. If you have any adhension issue we recommend you to wipe the PEI surface with alcohol before the next printing.
- •【More Practical, More Convenient】SV07 boasts several optimizations, including LEDs around the nozzle, tool drawer and high quality belt. Added LED bars under the extruder helps to observe the prints at night and capture beautiful prints pictures so that you could share with your friends on social media. The high strength belt with anti-slip design ensures stable transmission. Besides, with the added tool drawer, you can achieve a quick storage for all your 3D printing tools.
Sovol SV07 3D Printer with Klipper 5 inch Touch Screen, Max Print Speed 500mm/s, 300℃ High Temp All Metal Hotend Planetary Direct Drive Auto Leveling Meanwell Power Supply Print Size 8.66x8.66x9.84in
List Price: $275.00$247.50DEALYou Save: $27.50 (10%)
Free shippingFree Returns – 30 daysFree Order CancellationSecure Payment2–3 Days DeliveryGet It June 25, 2026In Stock (1)No marketing spamNo account requiredFulfilment by FedEx / Amazon / UPS / ShipwirePayPal / Card Buyer Protection
Customer Reviews
Reviews sourced from verified Amazon purchasers3.7
out of 5
Based on 10 reviews
5★
70%
4★
30%
3★
0%
2★
0%
1★
0%
All things considered, a great printer
Vigo The Carpathian✓ Verified Purchase•January 14, 2024
So this is more my journey dialing this printer in than an actual review, but let me just start by saying for the price, I think that I made an excellent choice with this printer. For a review on the product, there is plenty on youtube once you really search.
I have been looking to replace my first 3D printer, which was XYZ Da Vinci 1.0a. I wanted better, but didn't want to pay more. At first I gravitated to the Creality Printers, looking at machines like the Cr-10 mini and Ender, but their limitations, particularly the Bowden Extruder had me wanting something with a bit more. I would like the easy ability to print filaments like TPU, and I also wanted a glass bed so I could build with ABS.
I came across the Sovol SV01 based on a negative review I saw on Youtube. The Reviewer pointed out a good half dozen reasons why this was a better printer on paper than the Cr-10 mini and Ender 3, but had difficulty getting it to print nicely. It struck me as an odd review. I dug more, and I found that multiple 3D printer reviewers who owned a good 5-10 printers in this price range would consistantly name the SV01 as their "Go-to" printer. That told me enough to take a leap. I am so far very glad I did. I think if I had not been cautious about getting the setup right, due to paranoia from the first review I saw, I would be frustrated, instead, I tuned it all up before I began, and have had some beautiful prints so far.
Here is what I noted needs to be done immediately to have a good first experiance with your SV01:
1) The power supply on mine was set to 220V. Plugging it in will do nothing unless you switch it to 110v first. There is a tiny red switch recessed in the back of the machine. Make sure that is flipped to 110 before starting up.
2) Multiple people complained about loose bolts they noticed after printing. , I saw some of that. The printer comes with a full set of hex wrenches. Tighten up everything before you begin.
3) The Print head was very loose and wobbly when I got it. Would have resulted in shotty prints. Tightening the roller tension isn't obvious either. What you have to do is take the little wrench provided to you and slide it into a little metal spacer between the roller and the plate. Loosen the screw, then turn that spacer until the roller tightens (Only up to 90 degrees) and tighten the screw back down. Do this for all the rollers until it is tight, but rolls freely for a precise print.
4) The fan blower for the hotend is only held by one screw. If that screw gets loose (and under heat, it will), then the blower will eventually swing down into your print and break. To avoid this in the short term, just duct tape the other side up so it wont fall. The long term solution is 3d print a better one found on thingiverse. The original is only 3d printed anyway.
5) I opened up the extruder, and there is a small black plastic guide between the extruder and the hotend. I noticed that it was pretty wide open guide. Ideally, there should be some PTFE tube placed inside this. I had some PTFE tube, so I cut a section about 1/2" in length and put it inside. If you don't have any PTFE tube, just buy some for $5.00 or so with this purchase and you can add that in right away so you can be set to print things like flexible filament.
With those housekeeping items, this printer should be a solid purchase. PLA has been beautiful, ABS has been doable as soon as I dialed it in. Going to be trying more filaments, but I am impressed with how clean looking my prints are.
If I am to call out the negative, this is just a little too "underground" of a printer so far. There isn't dedicated online forums for this printer, and the website is hit and miss for information. You are going to be figuring some things out for yourself. Hope that will change with time.
What the Ender 3 Pro SHOULD have been, but wasn’t.
The BV3D Channel ✓ Verified Purchase•December 8, 2023
I want to talk about what I like, and what I don't like about the Sovol SV01. It's a pretty nice 3D printer for the price. Speaking of price, I want to tell you right up front that I got this printer at a discount. What follows is my honest impression of this printer. All opinions expressed are my own.
Before I get into my likes, dislikes, and experiences, I want to compare the SV01 to the Ender 3 Pro. As I see it, that is the printer it's trying to beat. And really, I think the SV01 is what the Ender 3 Pro SHOULD have been, but wasn't.
COMPARISON WITH ENDER 3 PRO
Don't get me wrong, I own an Ender 3 Pro and I love it. When it was released, it had a $300 price tag, but it only had three differences from the original Ender 3:
- The Ender 3 Pro uses a 24v Meanwell power supply, which is a well-respected brand.
- The Ender 3 Pro uses a 4040 extrusion on the Y axis, instead of a 2040 extrusion.
- The Ender 3 Pro flipped its electronics box upside down, so the fan was on the bottom.
Now, compare that with the Sovol SV01, which, as of this review, is priced at $279 ($299 with a $20 instant-off coupon on the page).
The SV01 has:
- A 24v Meanwell power supply, like the Ender 3 Pro
- A larger print volume, in every dimension (SV01: 240 x 280 x 300 vs E3P: 220 x 220 x 250)
- Dual Z motors (Ender 3 Pro only has one)
- A direct-drive extruder (Ender 3 Pro uses Bowden-style extruder)
- A filament runout sensor
MY EXPERIENCE WITH THIS PRINTER
The SV01 was easy to assemble. The frame is made of the typical black aluminum extrusions. Basically, it goes together like this:
- Bolt the "tower" part of it to the base part
- Attach the screen to the front of the printer and plug in its cables
- Attach the Z end stop switch to the tower
- Plug in the cables for the motors and end stop switches
- Level the bed
- Start printing
During assembly, I did have an issue with a screw that fell out of the printer and was loose in the box. I identified it as belonging on the wheel bracket on the right side of the printer, so I reattached it. A loose screw isn't completely unheard of on a 3D printer kit. But it could've been a problem if I hadn't looked around on the printer to see where to put the screw.
Almost every other printer I've ever bought only had a few meters of filament. The SV01 included a generous 200g spool of white PLA filament. It's a small spool, but still, it's really a spool. Usually you only get a little coil of filament. If this is your first printer, you'll be able to print a few little models before you have to buy some filament.
The SV01 also has an "Ultrabase"-style glass bed, which clips onto the heated aluminum platform. Prints (usually) release when the bed cools down. If they don't, a gentle tap with the handle of the included scraper will usually set them free. Some prints "” those with a big footprint on the bed "” may need a little more convincing to set them free. But don't use the included scraper to do this. You'll likely scratch the glass bed. I printed a large architectural model (a scale model of a particular room in my house), which was held tight by the bed. I ended up using a wide plastic putty knife to get under it and release it.
If you're concerned about the unusual bed size, its 240x280 dimensions are the same as the Anycubic 4Max Pro. While I don't see additional bed surfaces available for the from Sovol either on Amazon or their own web site, you can get the Anycubic glass bed here on Amazon. I might pick one up so I have a spare, or so I can swap the glass between prints. That way I can start a new print without waiting for the first one to cool down.
Oh, that architectural model I mentioned? I printed it at a speed of 80mm/s. That's pushing the limits of this printer, and is the typical top speed for printers in this price range. The print quality was"¦ pretty good. I consider that speed to be the equivalent of "draft mode" on a paper printer. It goes fast, but the results aren't showcase quality. Having said that, my usual print speed is around 40mm/s, and I get REALLY good results with the SV01 at that speed (that XYZ cube was printed at 40mm/s). I tend to print at speeds around 40mm/s on ALL my printers, unless I need "draft mode quality".
I did have a problem with the input knob on the screen. Turning the knob didn't consistently send input to the printer. This is being taken care of under warranty. If you buy the SV01, know that if you have a problem, Sovol will honor the warranty on it. It can take a few days (ok, 10 days) to receive a part like the screen, but they will take care of you. And don't forget, this is Amazon "” you have 30 days to return or exchange it if you run into an unresolvable issue.
WHAT I LIKE ABOUT THIS PRINTER
I like the print volume. This is the largest printer I own, and the architectural model I mentioned earlier easily fit on the print bed.
I also like the direct-drive extruder. Out of all my printers, only my Ender 3 Pro uses a Bowden-style extruder. And while Bowden extruders work well, I feel that direct-drive extruders work even better. The filament path is straight from the extruder into the nozzle on a direct-drive system, so all filaments feed easily. This is especially true if you are printing with flexible filaments, or brittle ones. And this is a geared extruder, which uses gear reduction to create a lot of torque.
The dual Z motors ensure that the X gantry stays level and doesn't sag on one side, as can happen with a single Z motor arrangement.
And while the filament sensor is nice to have, I usually monitor my prints so that running out of filament isn't really an issue for me.
WHAT I DISLIKE ABOUT THIS PRINTER
The biggest complaint I have with this printer is that its case fan is LOUD. There's a fan inside the case that's supposed to keep air moving across the circuit board inside. When the printer is turned on and not actively printing, this is the loudest thing on it.
Cable management for the print head is not perfect. It would benefit from having a little more thought put into it. The cables can sag down into the print area, and potentially catch on, or knock over, part of a print. So you'll want to keep an eye on that. I printed a cable chain to keep those cables under control.
THE TAKEAWAY
For the price, the Sovol SV01 is everything the Ender 3 Pro should have been, but wasn't. It has a larger print volume, dual Z motors, a direct-drive extruder, a filament runout sensor, and as of this writing the SV01 is $279. A quick glance shows Ender 3 Pro printers on Amazon for $259. So, for a little more than the cost of an Ender 3 Pro, you can get the SV01 with some pretty nice features.
Really fast!
Phil C✓ Verified Purchase•December 4, 2023
The media could not be loaded. Good
* Fast
* klipper as default
* LEDs on the print head
* PEI bed included
Bad
* Noisy
* Some things feel rushed
* Not open source like the SV06/SV06 plus is
* Filament reel holder to *too* loose
Speed is undoubtedly the best thing about this, it's really fast. Whilst it's never going to be printing at 250mm/s the entire time, the points it hits that speed are amazing to see the print head move that fast. One downside of this being a bed slinger and being this fast is that I found your model has a higher chance of being dislodged from the bed from a fast Y-axis movement. Using an brim or a larger brim will prevent this. A sub 30 minute benchy is incredible out of the box. It's not the prettiest, but this is before dialing in the settings properly.
Klipper as default is a big change. I normally prefer operating my printers via
Octoprint and this is my first hands-on experience with Klipper. There is much
to learn and I have not ran input shaping yet. You can print from a USB drive
(instead of a SD card) on the Klipper pad that has 3 USB sockets. Or you can
just upload it directly via the Klipper Fluidd web UI. Wi-Fi of course is standard. Adding a webcam for monitoring your prints appears to be quite simple, but not sure why it kept having issues staying on screen as seen on the video. An accelerometer is included for input shaping.
Unlike most 3D printers that have a hot end fan and a part cooling fan; this has a secondary part cooling fan. And boy is it loud! I don't have a sound meter to record the decibels, but it's something like a hair dryer range of loudness. It would be tricky to sleep in the same room as this. Or have a telephone call. It really does need it though because of the extra speed requires extra cooling. It is mounted on the X-axis gantry not on the print head so does not move or add weight to the print head.
The filament reel holder is on bearing and rotates quite freely. This on paper sounds like a good idea. For standard 1Kg reels this is a problem because it spins too easily which encourages tangles on the reel. Easy enough to just tape it down so it doesn't rotate. For a larger reel I imagine this is a good thing since there would be more friction with more weight. The one 3Kg reel I do have has a small spindle hole in the middle and does not fit the the holder so I cannot test this theory out.
I'm unsure about the mounting of the third fan seems like an oversight in required cooling, but it maybe because of too much weight on the print head. The right-side Z-axis stepper motor connection wire comes out of the case from in front of the gantry and is taped down and routed to the back of the gantry where the Z-axis motor and screw is. For the left side Z-axis motor this is not the case. This kinda feels like an afterthough on cable routing and feels like it was rushed somewhat.
Compared to the previous SV06 I have it is good to see they secured the heated bed wires properly. SV06 it was poorly secured and would come loose if you did not print something to secure it. Filament run out sensor being included was certainly missing from the SV06
Not sure I would recommend this as someone's first printer. There are a lot of Klipper concepts that may be too much for them as this is my 5th 3D printer and am still learning those myself.
Tips :
* Remove the foam under the bed, not mentioned in the manual. It is black and hides into the body of the printer. It can be easily missed!
* Instead of attaching the ribbon cable for the print head to the X-axis back plate, I used a retractable keyring holder that keeps this cable clear. I also did this on my SV04 and SV06
* Cura 5.4.0 has the definitions for the SV07, this is recommended to use this
Conclusion : A very fast and capable printer, but the hair dryer sound levels may be too loud for some. Other than the downsides are minor
Delivers an exceptional value with maker-friendly features, and prints so fast!
Jad Bean✓ Verified Purchase•November 17, 2023
The Sovol SV07 Plus is an exceptional value. This printer is made of quality parts and, when tuned, can deliver amazing print results!
My first printer was a Prusa MK2.5s+ which I had for many years before it died. So this review is largely a comparison against that model; also be aware I am coming in having had a few years of experience with filament 3D printing. The first things I want to highlight are the 'wow' elements that I noticed right away:
- included filament runout sensor would have saved me many times on my old printer
- the flexible PEI sheet is a dream to use, it's so easy to remove parts!
- tool drawer is very handy
- recovery from a power loss is a huge help
- adjustable elements (eccentric screws, belt tensioners, bed leveling screws) are easily accessible
- multiple tools AND a spare nozzle are included!
- servos are extremely quiet, the only noise issue is the part cooling fan; this can be adjusted, or if it's running in an adjacent room, will just sound like white noise
Assembly was straightforward and I didn't have any issues. Setting the Z tilt, leveling the bed surface, etc. were easy to do, and I was really impressed with using the screen to go through these steps. I watched YouTube videos to go through these steps as that's easier for me than reading a manual, though the included manual is well written.
Be aware that since this device is so large, you'll need a large workspace for it - and make sure it's STABLE! The servos are powerful and move the bed around quickly; be sure you have a well anchored work surface, otherwise this will create a lot of 'shimmy' and vibration in your prints. Once you have it on a solid surface, you'll really start to reap the benefits of the Klipper features. The first Benchy that I made using the included gcode came out really well, all things considered, for a first go. I look forward to stabilizing my work surface and then getting into fine-tuning my slicer settings to really dial in the quality.
This is a device for the hobbyist who enjoys fine tuning and really getting to know how their devices work. This isn't a works-flawlessly-out-of-the-box device, like a Bambu. You should expect to put time in to assemble and understand every component of the printer, which honestly you'd want to do anyway because I don't care what marketing materials say, EVERY printer will need maintenance and adjustment eventually!
But that being said, you're getting a Klipper printer that is still very capable of creating amazing prints and that is MUCH less expensive and has a significantly larger build volume. Highest recommendation for 3D print enthusiasts on a budget!
Faith in Bed Slingers Restored
Cory Isakson✓ Verified Purchase•October 28, 2023
The media could not be loaded. Print me Impressed! I have been 3D printing for about 5 years. My first machine was basic, but got the job done. It did not have automatic anything. Earlier this year I replaced it with a fast CoreXY machine. After that experience I could not imagine those old style bed slingers printing with the same speed and quality I now expect. Well, Sovol has done it with this machine. Here are some things I loved and found super helpful that I never had on a previous machine of this type.
Bed Leveling assistance and mesh. The user interface walks you through the bed leveling process to help you get dialed in. Tip: Heat the bed first to more accurately represent conditions during printing. After that the machine not only creates the mesh, but will show it to you and allow you to save different profiles as ambient conditions and heat levels can have an impact.
Build Quality. The machine looks and feels well built and solid without being an industrial erector set.
Print quality. The fact is nothing matters more than the quality of the products coming off of the machine. This machine is fast by default. I have not done any special tuning and out of the box the quality and speed are enough for me to be extremely pleased. Tip: the default 190C for PLA is probably too low for a lot of brands. I turned it up to 200 and got some amazing results without doing any additional tuning.
Every machine has room for improvement. Biggest improvement I'd like to see is in the setup and installation guide. Thankfully I know what I am doing and could figure out a few of the small things that were unclear. Most folks will figure it out, but it would be well worth the investment for Sovol to have a highly detailed and user tested getting started guide. The screws were labeled Steps 1-10 which was confusing because the guide references the screws by size, not step. Some of the actually steps were a little vague. When your biggest complaint is the setup guide, it's pretty good machine!
** Reduced to 4 stars
Control board overheats when running above 200mms. Requires a fan or so I am told. Should come with one if required to run at full speed.
Getting the machine leveled for top quality prints is not easy and beginner may really struggle with it.
Page 1 of 2